
Under $10 KAP Solution
Gary Vigue, Waterville, Maine, USA May 18, 2000
Thought you might be interested in my under $10 KAP solution for people who want to step into the
hobby with little risk.
A week or so ago I got the idea to attach a camera to a kite for some overhead views of my property. My wife kind of shakes her head and
walks away when I get off on these tangents. Anyway, after fumbling around on the Internet for a few days I found this group.
I read about your ideas, and some from other personal web pages and came up with my own plan. Since I tend to dart around from one new
hobby to another I figured I better keep it cheap!
I liked the idea about using ice as a timer. (cheap cheap!!) I came up with a simple device to do the job using things I had kicking around the house. In fact I built the entire suspension system, cradle and timer in under an hour. (Figure 1)
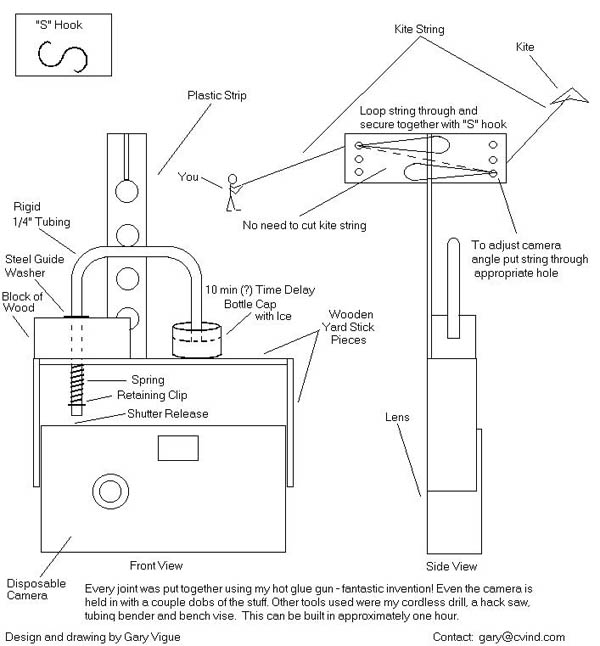
Figure 1
My material list includes: One wooden yard stick (or meter stick for the European version), a small collection of plastic soda bottle caps, a small block of wood, a short length of 0.25" tubing, a spring, 0.25" retaining clip, one steel washer, a small “S” hook (home made) and some scraps of sturdy plastic material. You could substitute yard stick for the plastic - I was trying to keep the weight down since all I have are kiddie kites. (cheap cheap cheap!!!)
Keeping it simple... I used a hot glue gun to assemble the entire thing. I even used daubs of hot glue to tack the disposable camera into the cradle. It took me about an hour to build.
It works perfectly! I mean that it is balanced and the timer works like a charm. I haven't had a good day to try it yet. I suspect that motion will be an issue so I bought a disposable camera with high speed film.
I have no way to weigh this thing. I would guess it is about 8 to 12 ounces including the camera and ice. I tried to fly it yesterday in a mild wind but it wouldn't quite get off the ground. It will take a good breeze to get this in the air with a small kite. I would recommend getting the kite WAY up - nearly out of sight. These small kites begin to pull pretty hard at that altitude. I doubt that you could get this up otherwise - I don't know. A larger kite would do better but of course the cost goes up as well.
I use nylon fishing line which cost about $2.00 for 700 yards (10-12 pound line).
caution: this stuff can cut your hands! Wear gloves.
I paid $1.89 for the kite. It is a standard plastic kiddie kite. Allowing about $5.00 for the camera the whole affair cost me about $9.00
If this is a design you would like to present to children I would make the following changes: (Figure 2)
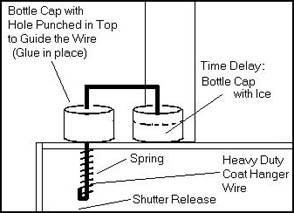 Figure 2
Substitute the wooden block with a bottle cap with hole punched in the top - scrap the metal washer. Also substitute the 1/4" tubing with heavy coat hanger wire. Bend the bottom of the wire to retain the spring. [Ed.- wooden yard stick as also substituted for the plastic pendulum pieces.]
Figure 2
Substitute the wooden block with a bottle cap with hole punched in the top - scrap the metal washer. Also substitute the 1/4" tubing with heavy coat hanger wire. Bend the bottom of the wire to retain the spring. [Ed.- wooden yard stick as also substituted for the plastic pendulum pieces.]
We [tested the concept] using a rig I constructed based on my second drawing (simplified version) though the winds were low we got it up about 20 feet. I am confident that this will fly given the right conditions. Also, this new rig is significantly lighter than the original. The wire coat hanger goes through the ice much quicker however - perhaps we will try putting a dime on top of the ice to extend the time delay. Otherwise it works like a charm.
Anyway I thought I would share this with you since someone was asking about inexpensive ways for people to get involved in KAP. All it cost me was a disposable camera and a kiddie kite to try it. I'll probably mothball the thing after I get a few good shots of my property but it will be an interesting and educational experience for my kids and I.