
A Beginnerĺs Guide to Kite Aerial Photography:
Lessons Learned from the School of Hard Knocks
Ed Johnson - Wayne, Nebraska, USA June 5, 2000
 PAGE 1
Introduction
I. Kites
II. Line
PAGE 2
III. Camera
IV. Lenses
V. Film
VI. Attaching and controlling the camera
PAGE 3
VII. Subjects
VIII. The Process (from launching to landing)
IX. Investments and Accessories
Introduction
I first launched a kite with a camera attached in the spring of ĺ99. When I saw the photos of my house taken from 500 feet, I was instantly addicted to kite aerial photography (KAP).
Iĺve found my greatest adrenaline rush from watching my camera swing at the end of a kite line. Part of the excitement comes from knowing so many things could go wrong. In the last two years, I feel Iĺve made about every mistake possible. I only wish someone along the way had warned me about some of them. Thatĺs why Iĺm writing this series of articles about what Iĺve learned. Hopefully these suggestions will save you from some of the problems Iĺve experienced along the way. --Ed JohnsonProf. of Mass CommunicationWayne State CollegeWayne, Nebraska.
I. Kites
 Ed and 13.5 foot Delta Conyne
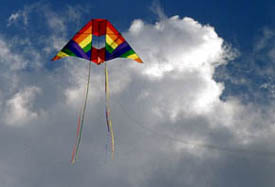
Choosing the right type and size of kite is critical to taking aerial photos. A couple of things to look for are superior lift and stability. The best design Iĺve found is the Delta-Conyne (DC). Mine have stayed up when nothing else wanted to fly. Others claim
success using Codies, Rokkakus, and French military kites. An airfoil (like a frameless wind pocket) can have great lift, but when the wind dies down, it drops like a rock, whereas a DC tends to glide down.
Ed and 13.5 foot Delta Conyne
Choosing the right type and size of kite is critical to taking aerial photos. A couple of things to look for are superior lift and stability. The best design Iĺve found is the Delta-Conyne (DC). Mine have stayed up when nothing else wanted to fly. Others claim
success using Codies, Rokkakus, and French military kites. An airfoil (like a frameless wind pocket) can have great lift, but when the wind dies down, it drops like a rock, whereas a DC tends to glide down.
 Delta Conyne with tails
Size can be nearly as important as design. A kite needs to be big enough to lift a camera without pulling you away. I use two sizes of DCs: for light winds I use a 13.5-foot wide DC, and for heavy winds I use a 9.5-foot wide DC. Both my DCs happen to be made by Sun Oak. Although Iĺve found none better, there are a couple of things Iĺd change. First, the 9.5-foot DC came with basswood spars in its leading edges that broke in rough landings. I replaced them with fiberglass tubing and have had no problems since. The second thing I changed were the two pieces of tubing that simply slide together to support each leading edge on the 13.5-foot DC. Once while flying this kite in a strong wind, these two pieces of tubing came apart. The kite and my camera went into a wild spin. Ever since then, I secure these two pieces with masking tape as I assemble the kite.
Delta Conyne with tails
Size can be nearly as important as design. A kite needs to be big enough to lift a camera without pulling you away. I use two sizes of DCs: for light winds I use a 13.5-foot wide DC, and for heavy winds I use a 9.5-foot wide DC. Both my DCs happen to be made by Sun Oak. Although Iĺve found none better, there are a couple of things Iĺd change. First, the 9.5-foot DC came with basswood spars in its leading edges that broke in rough landings. I replaced them with fiberglass tubing and have had no problems since. The second thing I changed were the two pieces of tubing that simply slide together to support each leading edge on the 13.5-foot DC. Once while flying this kite in a strong wind, these two pieces of tubing came apart. The kite and my camera went into a wild spin. Ever since then, I secure these two pieces with masking tape as I assemble the kite.
Consider adding tails to your kite. I attach a pair of 15-foot nylon tails to the center of my DCs. They seem to help stabilize the kite and keep it pointed into the wind. They also act as a drag when the wind stops--this keeps the kite from gliding directly overhead and
then dropping. Shop around when looking for kites. There are lots of good sources that offer a variety of features, from price to service. I often buy supplies from Into the Wind because I like their catalog. Finally, learn to sew. Youĺll spend a lot of your spare time
mending small holes and tears.
II. Line
It's amazing how many problems you can have with something as simple as kite line. Here are eight suggestions to keep in mind: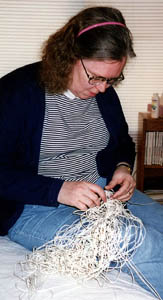
A. Use what's recommended. Wanting to take some high- altitude photos, I replaced the line on my reel with some that was twice as long, but half as strong. But that original 250-pound line was recommended for my 13.5-foot DC, and twice now I've had this kite snap the replaced 150-pound line. One of my greatest KAP disasters was having to chase my runaway kite as it drug my camera across a golf course. The result was a mangled camera and mount. I've learned my lesson and now use only the recommended line.
B. Reel in your line. Don't just gather it up, even if it's getting dark or raining. You'll spend weeks trying to untie the knots you've created.
[Ed.- Why worry about this if your wife is going to untangle the mess?]

Walk-Down Pulley C. Walk your line down. Don't use your reel to pull your kite down. It builds up a great deal of pressure that can break your reel. Instead, secure your line to an anchor, then hold the line as you walk toward the kite to bring it down. Use at least gloves. They'll save you a lot of pain. Sometimes I attach a pulley to my line and walk it down with a hook attached to an ax handle. A belt loop makes convenient place to carry this hook or an anchor.
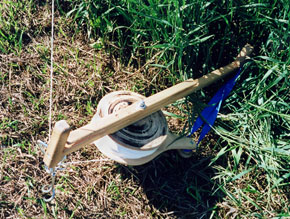 Strato-spool
D. Select your reels carefully. I've used three different types of reels and found Strato-spools the most satisfactory, especially for the 250-pound line needed for my 13.5-foot DC I like the control I have with the brake and crank handles, although I found the small patches of leather for its brake to be inadequate. I used the reel for the first time on a very windy day. As the reel spun out line, I tried to apply the brake. Smoke began pouring out from it, and in a moment the pieces of leather shot out into the field before me. I replaced those original pieces with a section out of an old belt that I cut to the full length of the reel. Another thing to watch for is avoiding being whacked by the Strato-spool's handle as it spins around. I've raised more than one welt from this. Now when I let out line, I keep the spool horizontal on the bottom of the reel.
Strato-spool
D. Select your reels carefully. I've used three different types of reels and found Strato-spools the most satisfactory, especially for the 250-pound line needed for my 13.5-foot DC I like the control I have with the brake and crank handles, although I found the small patches of leather for its brake to be inadequate. I used the reel for the first time on a very windy day. As the reel spun out line, I tried to apply the brake. Smoke began pouring out from it, and in a moment the pieces of leather shot out into the field before me. I replaced those original pieces with a section out of an old belt that I cut to the full length of the reel. Another thing to watch for is avoiding being whacked by the Strato-spool's handle as it spins around. I've raised more than one welt from this. Now when I let out line, I keep the spool horizontal on the bottom of the reel.
Marked Line
 My second choice is the hoop spool, which functions acceptably and is much cheaper. I carry a nine-inch spool with 1,700-feet of 150-pound line for my 9.5-foot D.C. It does require more strength to control. A strong gust can rip a spool out of your hands. Wearing heavy gloves will help you hold on to your spool as well as prevent friction burns. I've had a hard time managing my Windbreaker hand-cranked reel. Because of its off-center
handles, the line tends to wind from side to side and become knotted.
My second choice is the hoop spool, which functions acceptably and is much cheaper. I carry a nine-inch spool with 1,700-feet of 150-pound line for my 9.5-foot D.C. It does require more strength to control. A strong gust can rip a spool out of your hands. Wearing heavy gloves will help you hold on to your spool as well as prevent friction burns. I've had a hard time managing my Windbreaker hand-cranked reel. Because of its off-center
handles, the line tends to wind from side to side and become knotted.
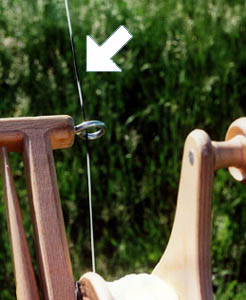
E. Mark your line. To help me know how far out my kite is, I mark my line every 100 feet. To measure my line, I first run a 100-foot tape measurer along the curb in front of my house. After tying one end of a new spool of line to my reel, I roll out the line to the end of the tape. I put a one-inch long black band on the line to indicate each 100 feet and red for each 500 feet. After marking the first 100 feet of line, I reel it in and mark the next 100 feet. I continue the process until the whole line has an appropriate mark every 100 feet.
F. Note what material you're using. Dacron seems to be a good basic material for single-line kites. Because it's synthetic, I take a match to the ends to melt the strands and keep them from unraveling.
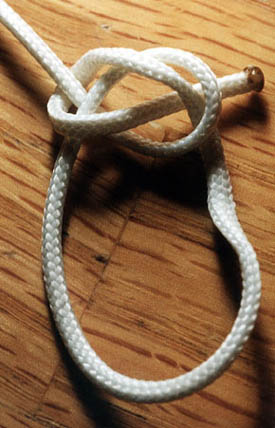 Bowline Knot
G. Know at least these two basic knots.
The knot I use most is the bowline. Begin by making a loop toward the end of your line. Take the end of the line, move it up through that loop, run it around the line behind, pull it back down through the loop again, and tighten. Once you've created a secure loop with this knot, fold the loop over against the line behind it to create a lark's head knot. I use this to attach my line to my kite. I believe it to be easier and stronger than metal spinners. The Boy Scouts have at least one excellent book on tying these and many other knots.
Bowline Knot
G. Know at least these two basic knots.
The knot I use most is the bowline. Begin by making a loop toward the end of your line. Take the end of the line, move it up through that loop, run it around the line behind, pull it back down through the loop again, and tighten. Once you've created a secure loop with this knot, fold the loop over against the line behind it to create a lark's head knot. I use this to attach my line to my kite. I believe it to be easier and stronger than metal spinners. The Boy Scouts have at least one excellent book on tying these and many other knots.