
Kite Flying Around Wind Obstacles
INTRODUCTION
As the wind blows across the landscape, the hills, the trees, and the buildings create variations in the wind's path and speed. As beginning KAPers our first experiences were in wide open places away from most of these types of wind obstacles. As our experience increases we move in closer to these same obstacles that we so cautiously avoided as neophytes. Frequently it is these very obstacles that become the subject matter of the really interesting KAP photographs that are taken.Flying kites in close proximity to buildings and trees increases the risks of the KAPing experience. A good understanding of the way wind interacts with such obstacles will allow the KAPer to control most of the risk involved.
Cris Benton has some great comments about this subject in his 23rd gallery "Wurster Hall at UC Berkeley" that he published in 1996.
BOUNDARY LAYER
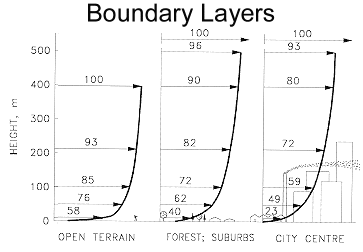 Chart by ALAN G. DAVENPORT WIND ENGINEERING GROUP
The wind becomes stronger at greater heights from the ground. The ground creates friction and turbulence which gradually tapers off at greater heights. The "Boundary Layers" chart shows how wind speed is affected by different types of terrain. The vertical scale is height above ground level, the horizontal scale is the percent of the "gradient wind" or unimpeded wind.
Chart by ALAN G. DAVENPORT WIND ENGINEERING GROUP
The wind becomes stronger at greater heights from the ground. The ground creates friction and turbulence which gradually tapers off at greater heights. The "Boundary Layers" chart shows how wind speed is affected by different types of terrain. The vertical scale is height above ground level, the horizontal scale is the percent of the "gradient wind" or unimpeded wind.
You will occasionally hear a KAPer talk about getting the kite up into "clean air" above surrounding buildings or trees, don't confuse this with "gradient wind". Looking at the graphs you can see that 100% "gradient winds" are far above the altitude KAPers fly their kites. "Clean air" refers to wind that has little or no turbulence caused by buildings, trees, and topography.
One hundred meters is a typical height for KAP kites. The chart shows that there can be up to a 36% increase in wind speed between ground level and 100 meters.
The fundamental principle to learn about the boundary layer is;
higher altitudes mean stronger winds.
RULE-OF-THUMB TO FIND CLEAN AIR AROUND OBSTRUCTIONS
RULE - Using the height (h) of the obstruction, you can avoid turbulent wind by flying at least 6 heights downwind, 2 heights upwind, or 2 heights directly above an obstruction.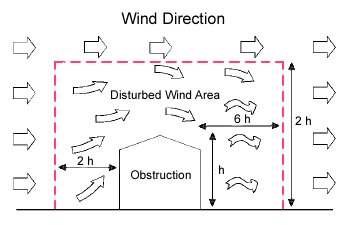 Diagram 1
Avoiding Turbulence Rule-of-Thumb
(Campbell Scientific) The area defined by the above rule-of-thumb is represented by the red dashed line in Diagram 1. As this discussion goes further you will see that most of the turbulence is on the downwind side of the obstruction. The areas directly above and windward will exhibit localized wind speed increases and changes of direction as the wind builds up and flows around and over the obstruction
Remember that many times you can attach your rig to the kite line such that the rig can be operated in the turbulent area while the kite is flying in clean air. A KAPer's life is easier if they avoid turbulent winds with the kite, but many great photographic opportunities would be missed if one didn't venture into or through the rough winds. We'll look closer at the characteristics of the wind in the Red Zone further down the page.
WIND VARIATIONS CREATED BY OBSTRUCTIONS
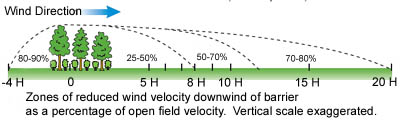 Diagram 2
Reduction of Airspeed Upwind and Downwind of Obstruction
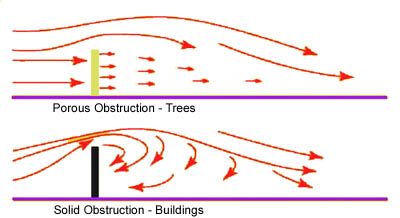 Diagram 3
Airflow Around Porous and Non-porous Barriers Wind Speed Reduction
According to a Iowa State University Extension publication about farmstead windbreaks, the wind speed on the windward and leeward side of an obstruction will be affected as indicated in Diagram 2.
The amount of turbulence downwind of an obstruction will depend on the type of obstruction involved. A solid obstruction such as a building will have strong eddy winds downwind of the building. Porous obstructions such as trees and vegetation allow some wind to pass through them and will have fewer eddys downwind (Diagram 3). Denser growths of trees will begin to behave more like solid obstructions having more eddy winds.
The density of the vegetative obstruction combined with the wind speed will determine both the amount of turbulence and the length of area with reduced wind speed downwind of the obstruction. Less density reduces the downwind turbulence and lengthens the area of decreased wind strength. Faster winds increase the turbulence but decrease the length of the protected area downwind. (Greenhouse Site Analysis, Stephen F. Austin State University)
FLYING INSIDE THE RED ZONE
 Diagram 4
Detail of Airflow Around a Building
If you wish to fly within or through the Red Zone depicted in Diagram 1 then an understanding of how wind flows around buildings is helpful.
As the wind dams up against the upwind side of the building, it creates areas of high pressure and increased wind speed along the upper edge and sides of the building before the wind spills over the top and sides. Small vortex or eddy currents are created just aft of these windward edges. There is a slight increase of pressure and thus wind speed along the downwind portion of the roof and sides. The wind then moves past the back of the obstacle and a huge low pressure area is created that causes the wind to curl in to fill the void.
Typically, KAPers fly their kites well beyond the red zone, but they may find themselves in situations where it is necessary to launch and land the kite within the red zone. Framed kites are generally a better choice in these situations for two reasons. First, in eddy winds, a soft kite is more likely to collapse when the wind direction suddenly changes, which is very likely to happen if you are trying to launch directly downwind of a building. Second, framed kites generally climb faster when you run or haul the line in, this will help get the kite past the areas of light wind and turbulence. Also, the quicker you can get the kite up and out of the turbulent air around a building the better.
A soft kite is not without its virtues when launching in the red zone. If there is a risk of the kite colliding with the building then a soft kite lowers the risk of damage to the building or itself. Some buildings may have structural or design features that could snag a kite or kite line, check the building before risking a confrontation that would cause your kite or line to become ensnared. Cris Benton's experiences, mentioned earlier, are a good example of using a soft kite in a very turbulent situation.
TOPOGRAPHY
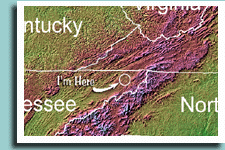 Relief Map of My Area
How the wind is affected by topography was my primary motive for this study. To understand more about my interest, click on the relief map.
Posted January 5, 2005