
LASS L-Angled Small System - Page 5
David Hunt - Gray, Tennessee, USA March 26, 2000
CONSTRUCTION (continued)
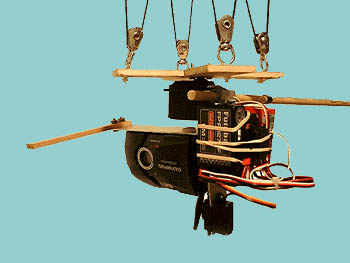 the LASS rig
 Figure 8
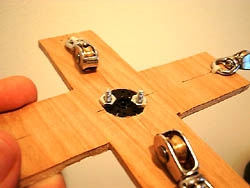 Figure 9
The Picavet
Figure 9
The Picavet
This is the last item to be constructed. The Picavet, using a network of line attached to the kite line at two points, will keep the rig level with the horizon while flying (more or less true, see Basics/ Kite Flying).
I chose to make my Picavet from a scrap piece of 3/16" cabinet plywood. Since you only need a 6" by 6" piece you may be able to find some scrap at a lumber store or a cabinet shop that won't cost you anything.
15. Cut out the Picavet cross according to Figure 8.
DO NOT DRILL HOLES UNTIL READING STEP 16!
16. Drill a 5/16" hole in the exact center of the Picavet cross. I chose to mount the Pan Servo flange on top of the Picavet. This required routing a 1/16" deep hole for the flange to rest in so the shaft end of the flange just barely protrudes from the other side (Figure 9)
This can be done with a small chisel, but a Dremel tool with a flat ended cutter bit works best (#38177).
(The servo flange could be mounted on the bottom of the picavet using 3 to 4 bolts, and eliminating the need for the routing described above)
17. Before placing the servo flange on the picavet drill two 5/32" holes opposite each other through the flange. Position the flange on the picavet and use one of the holes as a guide to drill a hole through the picavet.
Before drilling the second hole through the picavet attach a 4mm nut and bolt through the hole you just drilled. The bolt head should be on the bottom side to allow clearance with the Pan Servo (see arrow Figure 10) This will prevent the servo flange from moving while drilling the second hole.
Once the second hole is drilled attach a second nut and bolt.
18. If you can find small pulleys at your hardware store like those in Figure 9, then drill two 5/32" holes at the end of each cross piece.
(If you can not find small swivels or if you wish to cut costs you can use small eye bolts in their place.)
I attached my pulleys using wire ties. Be sure to leave the wire ties loose so the pulleys can flop back and forth as needed.
19. Attach the picavet to the Pan Servo.
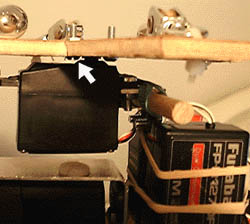 Figure 10
20. For those not familiar with how to thread line through the pulleys or eye bolts, check out this direct link to Cris Benton's discussion of the subject:
Picavet Info On Cris Benton's Page
In the past I have used a single small chrome plated welded ring at each kite line attachment point in place of the pulleys described on Cris' page. Brooks Leffler even further refined the picavet in an Aerial Eye article (AE 4:1, winter, 1998).
(Read about the picavet HERE .
)
21. The last step is to attach a 2 foot length of 1/4" wooden dowel to hold the Receiver antenna wire out of the way and to act as a camera aiming guide. I used rubber bands to hold the dowel to the inside corner of the small L-angled piece (Figure 10 above).
What was it I was upset about?